Category: Photo Editing

  • Bracketed Images : Real Estate Photography Explained

    Bracketed Images : Real Estate Photography Explained

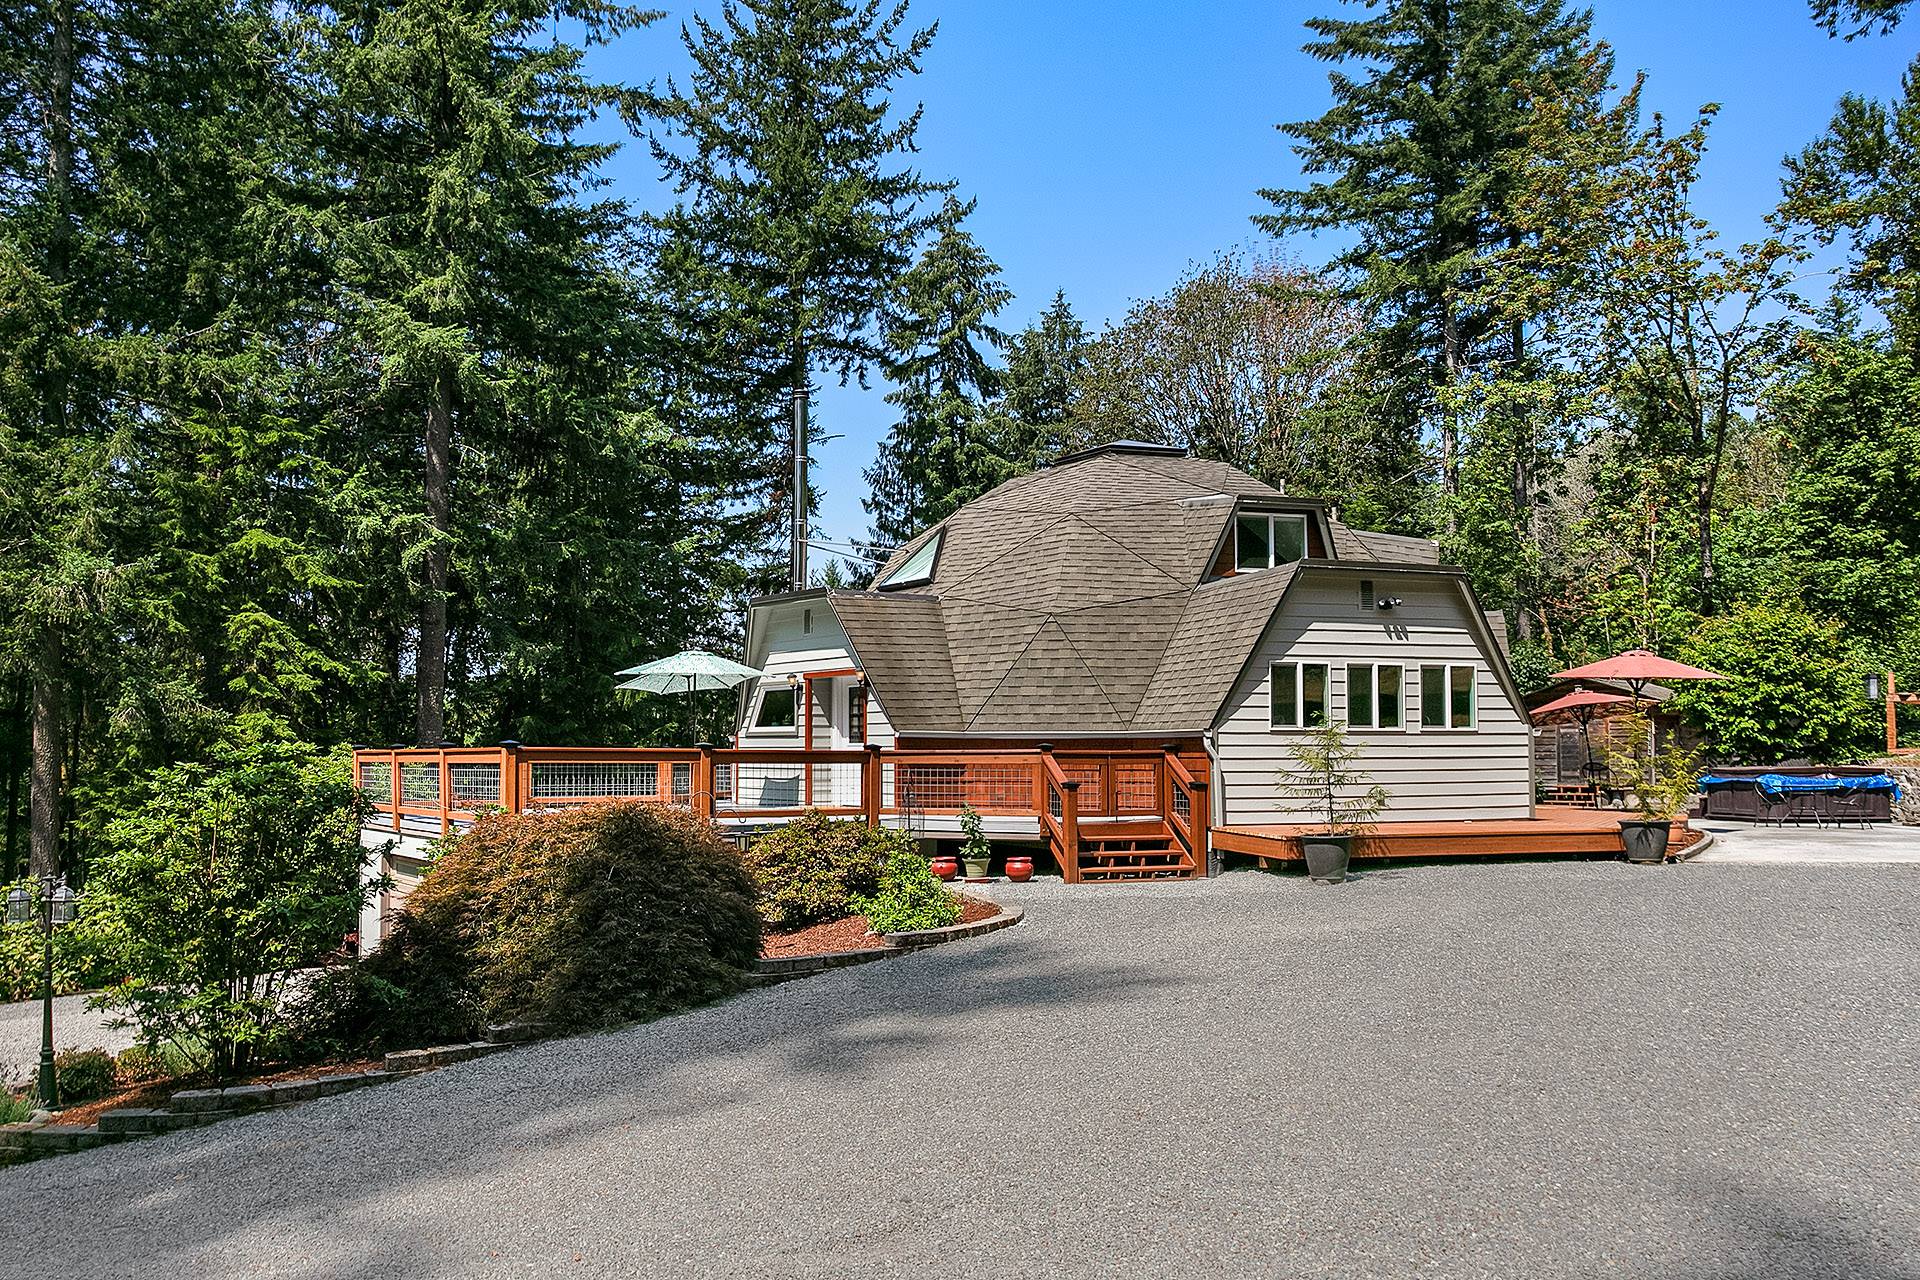
    Bracketed images are a fundamental aspect of real estate photography that can greatly enhance the quality and appeal of property images. This technique involves taking multiple photographs of the same scene at different exposure levels, and then combining them to create a single, well-balanced image. This glossary entry will delve into the intricacies of bracketed images, their significance in real estate photography, and the various methods and techniques used to create them.

    Real estate photography is a specialized field that requires a unique set of skills and techniques. One of the most important of these is the ability to capture high-quality images that accurately represent a property and its features. Bracketed images are a key tool in achieving this, as they allow photographers to overcome common challenges such as varying light conditions and high-contrast scenes.

    Understanding Bracketed Images

    Bracketed images are a series of photographs taken of the same scene, but at different exposure levels. This technique is used to capture a wider range of light and detail than can be achieved with a single exposure. The resulting images can then be combined, or ‘blended’, to create a final image that includes the best elements of each exposure.

    Section Image

    The term ‘bracketing’ comes from the practice of taking a ‘bracket’ of photos, typically one correctly exposed, one underexposed, and one overexposed. The underexposed image captures the details in the highlights, while the overexposed image captures the details in the shadows. The correctly exposed image serves as a baseline for the other two.

    Types of Bracketing

    There are several types of bracketing used in photography, each with its own specific purpose and technique. These include exposure bracketing, flash bracketing, depth of field bracketing, and white balance bracketing. However, in the context of real estate photography, exposure bracketing is the most commonly used.

    Exposure bracketing involves taking a series of images at different exposure levels. This is achieved by adjusting the camera’s shutter speed, aperture, or ISO settings between shots. The number of images taken and the difference in exposure between them can vary depending on the scene and the photographer’s objectives.

    Benefits of Bracketed Images in Real Estate Photography

    Bracketed images offer several advantages in real estate photography. Firstly, they allow for a greater dynamic range in the final image. This means that both the darkest and brightest areas of the scene can be accurately represented, resulting in a more realistic and appealing image.

    Secondly, bracketed images can help to overcome the challenges posed by varying light conditions. For instance, a room with a window might have a bright exterior and a dark interior. By taking bracketed images, the photographer can capture detail in both areas and combine them into a single, well-balanced image.

    Creating Bracketed Images

    Creating bracketed images involves several steps, from setting up the camera and capturing the images to processing and blending them in post-production. The specific process can vary depending on the equipment and software used, as well as the photographer’s personal preferences and the specific requirements of the scene.

    Section Image

    However, the basic process typically involves setting the camera to bracketing mode, selecting the number of bracketed images and the exposure difference between them, capturing the images, and then blending them together using software such as Adobe Lightroom or Photoshop.

    Camera Setup

    The first step in creating bracketed images is to set up the camera. This involves selecting the bracketing mode, which is often found in the camera’s menu or settings. The photographer then needs to choose the number of bracketed images and the exposure difference between them. This can typically range from three images with a one-stop difference, to nine images with a three-stop difference.

    Once the settings have been selected, the photographer can then compose the shot and capture the bracketed images. It’s important to keep the camera steady during this process, as any movement can result in misaligned images. Using a tripod can help to ensure a stable shot.

    Post-Production

    After the bracketed images have been captured, the next step is to blend them together in post-production. This involves importing the images into a software program such as Adobe Lightroom or Photoshop, and then using the program’s HDR (High Dynamic Range) or blending tools to combine the images.

    The goal of this process is to create a final image that includes the best elements of each exposure. This might involve using the shadows from the overexposed image, the highlights from the underexposed image, and the midtones from the correctly exposed image. The specific process can vary depending on the software used and the photographer’s personal preferences.

    Challenges and Solutions

    While bracketed images offer many advantages in real estate photography, they also present some challenges. These include the need for a steady camera, the potential for misaligned images, and the time and skill required for post-production. However, with the right equipment, techniques, and software, these challenges can be effectively managed.

    For instance, using a tripod can help to ensure a steady shot, while software features such as automatic alignment can correct for any minor movements between shots. Additionally, practice and experience can help to improve efficiency and skill in post-production.

    Ghosting

    One common issue that can occur when creating bracketed images is ghosting. This is when moving objects appear as a blur or ‘ghost’ in the final image, due to their movement between exposures. This can be particularly problematic in real estate photography, where elements such as trees, curtains, or people might move between shots.

    However, many software programs offer tools to reduce or eliminate ghosting. These typically work by identifying the moving objects and then using only one exposure for these areas. Additionally, planning the shoot to minimize movement, such as closing windows to prevent curtain movement, can also help to reduce ghosting.

    Overblending

    Another potential issue is overblending, which is when the blending process results in an image that looks unnatural or overly processed. This can occur if the difference in exposure between the bracketed images is too great, or if the blending is not done carefully.

    To avoid overblending, it’s important to use a suitable range of exposures for the bracketed images, and to take care during the blending process. Using software features such as tone mapping can also help to create a more natural-looking result.

    Conclusion

    Bracketed images are a powerful tool in real estate photography, allowing photographers to capture a wider range of light and detail than can be achieved with a single exposure. By understanding and effectively using this technique, photographers can enhance the quality and appeal of their property images, and better represent the properties they are photographing.

    Section Image

    While creating bracketed images can present some challenges, these can be effectively managed with the right equipment, techniques, and software. With practice and experience, photographers can master this technique and use it to create stunning, high-quality real estate images.

  • 4 Steps to Retouch your Real Estate Photo Using Adobe Photoshop CC

    4 Steps to Retouch your Real Estate Photo Using Adobe Photoshop CC

    A photographer does not only consider the right time of day to create good shots. There are factors which are considered important in developing high-quality real estate photos. But this is just the beginning. Photo retouching works will consume lots of your time to enhance real estate photos. These retouching skills are essential to create magnificent photos for prospective clients and become interested in the property you are selling.

    Use Photoshop CC to Retouch your Real Estate Photos

    Real Estate Photo Using Adobe Photoshop CCReal estate photo retouching is one of the most common tasks to be done when it comes to property image enhancement. To make photo retouching using Adobe Photoshop CC, it is important to have this application downloaded to your PC or Mac. Editing and previewing of Canvas should be done first for the blank page to show up.

    Unlocking the background layer is done by the LOCK symbol. You need to double click this so that a new layer screen will pop out. To add more layers, simply click the DUPLICATE LAYER or NEW LAYER. Take note that if you have three new layers, you need to work on a separate layer for circle and colors, and always save your work.

    4 Steps to Retouch Real Estate Photos using Photoshop CC

    There are countless options that photo editors can use to retouch real estate images. In this way, photos will look perfectly amazing. Below are some of the basic retouching techniques for real estate photography.

    1. Make color correcting a priority.

    Color correction is probably the most basic essential step in real estate photo retouching. Depending on the kind of property you want to advertise or sell, it is important to adjust the saturation, hue, and tint. Adjusting greens is a common color error in real estate photography. You need to capture the dynamics of the exteriors that can be challenging to newbies.

    What you will do is choose Adjustment after selecting Image. Select Yellow afterward from the drop-down menu to adjust the Hue to +15 and Saturation to -5. You can also adjust the hue, saturation, and lightness by selecting Green from the drop-down menu.


    How to fix color casts for Real Estate by Nathan Cool Photo
    More tips here: https://helpx.adobe.com/photoshop/how-to/adjust-correct-color-balance-photoshop.html

    2. Make sure the lines are straight.

    A very important rule when shooting properties is to become extra careful with the lines. A straight line is always important in making the property look great. This happens when the camera is not angled properly. Regardless if it is an interior or an exterior shooting, it is important to make sure that the lines are straight. In using Photoshop CC, aligning and straightening of lines can be done using Free Transform. In using this feature, make sure that the entire image is selected and try to drag the corner of the photo adjacent to where the lines are leaning towards.

    exterior photography

    • You can also click on the Rectangular Marquee from the Toolbar and select the entire image.
    • Click the Edit and Transform. From there, click the Skew from the drop-down menu.

    Drag the corner of the picture to the left if the property is leaning to the right. Make it a point that you need not pull too far because this might be very unrealistic. Click the Check button after the edges are aligned and are all straight.

    3. Space must be evenly lighted.

    One of the most common problems that are encountered in real estate photography is the uneven distribution of lighting. This problem can create unwanted shadows and undesirable dark areas. To avoid this problem, you can drag the Shadows bar to the right to open the shadows a bit. You can also drag your highlights bar to the left to move the hot spots down.

    interior photography

    Lighting up the corners of the interiors is also a challenge.

    • To balance and even out lighting, go to the Dodge tool. Select the right size of the brush to work with. To add brightness to the darker part, drag the Dodge tool over the darker area.
    • You then need to go to the Filter menu and select Sharpen and click on Unsharpen Mask. To get clearer and quality details, increase the amount then finally click OK.

    4. Remove unwanted objects from your photo.

    There are times when unwanted objects roam around your photos. Using the Clone Stamp Tool, you can declutter those unwanted objects, start cloning and painting over the objects. You can do this by simply clicking the Clone Stamp Tool and selecting the source area. To define the clone source, you can Alt-click for Windows or Option-click for Mac.

    Under the Clone Source, you can do many things to those unwanted objects. You can flip clone source, resize, squash or stretch clone source, rotate clone source, or display options when painting with the clone tool. You can also offset of a painting area from the clone source and have options to video.

    Step by step tutorial: Remove objects with the Clone Stamp tool

    Featured photo credit to https://helpx.adobe.com/

  • Real Estate HDR Photo Editing Tips

    Real Estate HDR Photo Editing Tips

    High Dynamic Range or HDR is a photographic technique used by most real estate photographers in shooting architectural and interior photos. It involves a reproduction of a greater dynamic range of luminosity that is beyond the results from using a standard photographic technique. It allows you to fuse different exposures by merging multiple photos of the same scene captured at contrasting shutter speeds, creating a finished product that is comprised of the best light information of each exposure.

    In essence, HDR enables you to balance interior spaces with exterior views, which tend to be overexposed in normal photos, helping you produce clear and vivid photos that are sure to satisfy your real estate agent.

    To successfully execute the HDR technique on your real estate photos, you may keep in mind these HDR photo editing tips:

    • Capture multiple bracketed images.

    Before you start merging your photos to create an HDR image, you have to make sure that you have multiple photos of a subject at different exposures. It is acceptable to take three shots of a single scene but, you may find it best to capture five images with contrasting exposures.

    photo via https://creativeraw.com/

    To take different bracketed images manually, you have to set up your camera in manual mode and then, simply adjust the aperture and shutter speed to capture a brighter or darker image. However, the easiest way to do this is by manually adjusting the light “darker” by using your camera’s exposure compensation buttons (+/- buttons) to underexposure your image by one to three stops (-1 to -3), and then overexposing it by one to three stops (+1 to +3).
    In shooting these bracketed photos, you have to ensure that each exposure is crisp and align. You can do this by using a shutter release cable and by making sure that your tripod is stable and completely still throughout the exposure set. It is also recommended that you use your camera’s self-timer, so you won’t have to manually press the shutter button, which can potentially shift the position of your camera and affect your photos.

    • Shoot in RAW instead of JPEG.

    Since HDR technology aims to fuse the maximum number of data from one exposure, you have to remember to shoot only in RAW, the top-quality file type for editing photos. This file format gives you flexibility in post-production because it allows you to not only edit your photos before taking them into an HDR editor, it also lets you edit your HDR images better without destroying the quality of your photo.

    • Consider your budget and the software’s quality.

    In choosing an HDR merging software, you do not have to be greedy and push yourself to buy the best and expensive software out there. You have to consider your budget since you can find relatively affordable photo editing software with HDR options such as EasyHDR and Lightroom. If you’re really short on budget, it is possible to find other free alternatives online like Nik HDR Efex Pro or Photomatix Pro which have free trials available that will help you in making a decision. However, using these requires putting a watermark on the final results that might spoil your photos. Moreover, if you happen to have a large budget to purchase editing software, you can choose the ones that are on the expensive end of the spectrum like HDR Darkroom. Ultimately, the best thing to do is to invest in software that does the job but also falls within your budget.

    • Know your audience.

    Since you can give an HDR image various looks, making it either very realistic or very dramatic, you have to know the audience and the purpose of the photos you will be editing. If the goal of your interior photography is to showcase them on online platforms or in exhibitions, you can use your HDR editor to produce dramatic, striking images. If, on the other hand, you are taking photos for a real estate listing, you should work to bring much realism as possible into your photos.

    hdr photography real estate

    • Get the most out of presets.

    Using an HDR editor’s presets give you the required control and flexibility to execute advanced HDR techniques with excellence and simplicity. The most recommended HDR presets are those available in Aurora HDR which can be accessed and use from within your Lightroom workspace.

    • Trust your visuals and tweak the photo as you desire.

    Lastly, while there are a ton of useful presets that can make your editing process easier, it would also count a lot to rely on your visuals in the post-processing. You can decide how much detail you want to recover and you can tweak the options such as exposure, highlights, shadows, contrast, and more to achieve your desired result.